
Azure resource group best practices: Optimize Your Cloud Deployment
IT professionals need clear foundational concepts to advance their careers and deliver successful projects. In Azure, Resource Groups serve as more than simple containers. They provide the fundamental structure for governance, security, and cost management across an entire cloud environment. If you fail to apply azure resource group best practices early, your organization risks high costs, security gaps, and operational friction that slows cloud adoption.
This guide provides an actionable checklist with 10 essential practices for a well-architected Azure foundation. These strategies help those preparing for the current AZ-104 or AZ-305 exams or managing enterprise environments. This material is specifically designed to help you prepare for certification with confidence and manage resources effectively in a production setting. You will learn how to:
- Structure resource groups strategically by environment and project duration to improve organizational clarity.
- Use standardized naming and tagging to improve organization and facilitate easier automation.
- Apply specific permissions across your resources using Role-Based Access Control (RBAC) principles.
- Maintain governance and compliance standards across every group with Azure Policy.
- Monitor resource health, track spending, and automate cleanup processes to control your budget.
Each section includes practical implementation examples and exam-relevant notes to help you apply these concepts. Following this guide ensures your Azure environment remains organized, secure, and cost-effective. You can build knowing your deployment is optimized for performance and budget from the first day you launch services.
1. Organize Resource Groups by Lifecycle and Environment
Organize your resource groups according to application lifecycle and deployment stage. This is a primary strategy for managing Azure environments. You should create distinct resource groups for stages such as Development (Dev), Testing (Test), Staging, and Production (Prod). Resources that share the same lifecycle—like the specific components of a production application—belong together in a single group.
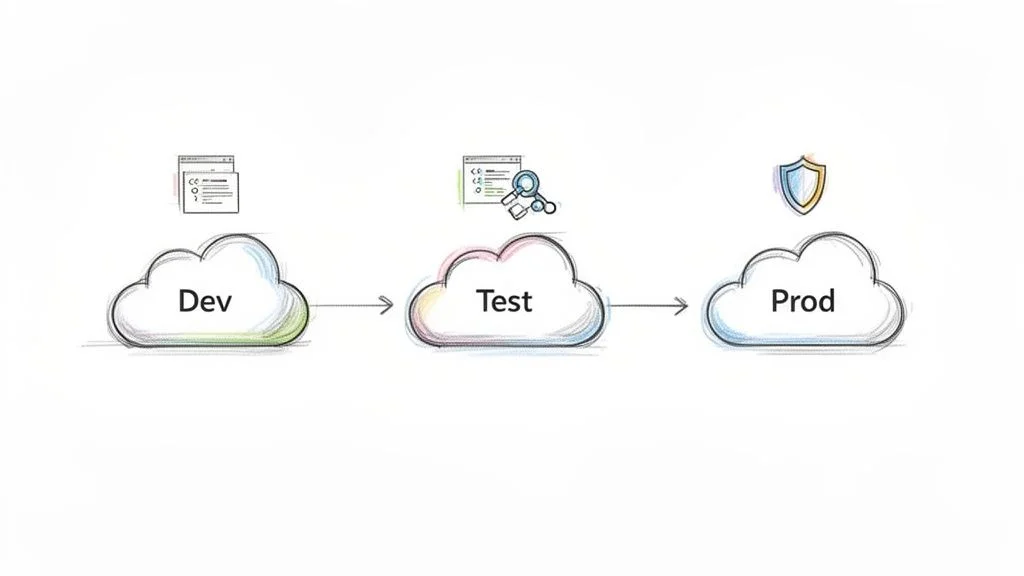 Illustration of a typical Software Development Lifecycle (SDLC) with dedicated resource groups for Development, Testing, and Production environments.
Structuring resources this way makes management more predictable. When you retire an application version, you can delete the entire resource group. This single action removes every associated component, which prevents orphaned resources from generating unexpected costs. This level of governance is a central requirement for passing the AZ-104 exam.
Why This Method Works
Grouping resources by environment creates clear boundaries and improves control. This logic mirrors the way project managers handle different phases in PMP. A DevOps team can assign broad Contributor permissions within a Dev resource group to allow for experimentation and fast iteration. Meanwhile, they can enforce Reader access in the Prod group to maintain stability and prevent unauthorized changes. This containment model lowers the chance of someone making an accidental change to a live system. It also simplifies the process of tracking spending for each specific environment, making it easier to report costs back to stakeholders.
Exam Tip: For the AZ-104 exam, understand that grouping by lifecycle is a primary method for managing resources that are developed and deployed as a unit. This strategy makes cleanup easier and supports cost management because you can remove an entire environment by deleting its resource group.
Implementation Tips
To apply this practice, follow these specific steps:
- Standardize Naming: Use a naming convention that includes the application name, environment, and Azure region. For example, use
rg-contosoApp-prod-eastusorrg-SAP-Dev-WestEurope. - Isolate Environments: Keep resources from different stages separate. You should never place a test database inside a production resource group. This separation protects system stability and helps you meet compliance requirements.
- Use Azure Policy: Assign specific policies to each resource group. You can restrict virtual machine sizes in Dev to manage your budget or enforce high-security settings in Prod to meet "secure by design" standards.
- Set Budgets: Use Azure Cost Management to create separate budgets and spending alerts for every environment. This prevents costs from spiraling, especially in non-production areas where monitoring might be less frequent.
- Automate with Blueprints: Use Azure Blueprints to deploy standard sets of resources, policies, and RBAC roles for new environments. This ensures that every new setup follows your established rules.
2. Implement Consistent Naming Conventions
Standardizing your naming convention is a high-impact strategy for maintaining an organized and scalable cloud environment. A logical pattern for resource groups helps teams identify a group's purpose, owner, environment, and location without needing to inspect individual resources. This clarity reduces friction, improves search results in the Azure portal, and provides a foundation for automation and Infrastructure as Code (IaC) deployments.
This systematic approach is a functional governance mechanism rather than just a stylistic choice. When names follow a predictable structure, scripts and CI/CD pipelines can reliably target specific resource groups for updates, deployments, or monitoring tasks. For organizations operating globally, including a region code in the name clarifies where data resides, which helps with compliance and performance troubleshooting.
Why This Method Works
A well-defined naming convention removes ambiguity and keeps your Azure subscription orderly. It creates a system of self-documentation that makes your infrastructure easy to understand. For instance, a developer or operations specialist can distinguish a production resource group from a development one immediately. This organization is vital for scripting, cost reporting, and resource filtering. It also accelerates incident response by allowing teams to find affected components quickly during a service disruption.
Reflection Prompt: How quickly can a new team member identify the purpose, owner, and criticality of a resource group in your current environment based solely on its name?
Exam Tip: Naming conventions appear frequently in Azure certifications like AZ-104 and AZ-305. You should be prepared to identify valid naming patterns and explain why a standardized convention is necessary for management and governance. Expect questions that ask you to select the most effective naming structure for a given scenario.
Implementation Tips
To apply a naming standard effectively, use these practical steps:
- Define a Clear Pattern: Document a standard pattern for the entire organization. A common format is
rg-[application]-[environment]-[region]. For example,rg-contoso-webapp-prod-eastusshows that the resource group holds production web app components for Contoso in the East US region. - Adhere to Azure Rules: Resource group names must be between 1 and 90 characters. They can only include letters, numbers, underscores, parentheses, hyphens, and periods. Using lowercase letters and hyphens, often called kebab-case, is a standard practice for consistency. While Azure allows many characters, keeping names simple prevents issues with certain command-line tools.
- Use Azure Policy: The best way to enforce your standard is through Azure Policy. You can create a policy that uses a regular expression to validate the names of new resource groups. This prevents anyone from creating non-compliant resources, ensuring your environment stays clean as it grows.
- Document and Socialize: Keep your naming convention documentation in a central location like a company Wiki or a Git repository. Make sure all teams understand the requirements. Short training sessions can help teams stick to the rules, ensuring everyone from security to development is on the same page.
- Validate in Pipelines: Check naming standards directly within your CI/CD pipelines. A simple script can verify that resource group names match your pattern before the deployment starts. This catches errors early, saving time and preventing the creation of resources that would later need to be renamed or deleted.
3. Apply Role-Based Access Control (RBAC) at Resource Group Level
Assigning permissions at the correct scope is a fundamental principle of cloud security. For Azure Resource Groups, administrators should assign Role-Based Access Control (RBAC) roles at the resource group level rather than on individual items. Resources within the group then inherit a consistent set of permissions. This simplifies security management and makes auditing more straightforward.
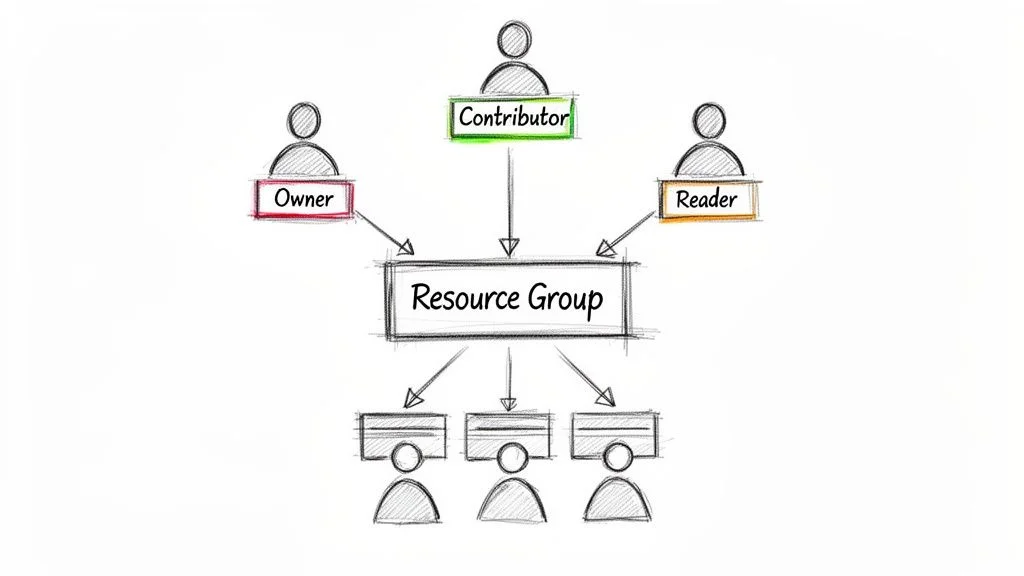 Visual representation of RBAC roles (Owner, Contributor, Reader) and their inherited permissions at the Azure Resource Group level.
Assigning a role like Contributor to a user or group on a resource group grants management rights over all resources inside it. This avoids the manual burden of configuring virtual machines, storage accounts, and databases individually. It is a foundational strategy for Azure security. Because of this, it appears frequently in certification exams such as AZ-104 and AZ-305. It also aligns with the principle of least privilege required for certifications like CompTIA Security+.
Why This Method Works
Applying RBAC at the resource group scope creates a clear security boundary. For instance, a development team might need Contributor permissions on their Dev resource group to test and build. However, that same team should only have Reader access to the Prod group. This follows the principle of least privilege and reduces the risk of accidental changes in production. To manage these permissions, administrators must understand different Access Control Categories. RBAC is the most common. A tiered approach to access management makes it easier to pass audits and comply with both internal policies and external regulations.
Reflection Prompt: Think about your last security audit. Could applying RBAC at the resource group level have simplified the process of validating permissions and ensuring least privilege?
Exam Tip: Candidates for the AZ-104 and AZ-305 exams should expect questions regarding RBAC inheritance and scope. Remember that assigning roles at the resource group level is the standard approach for managing a collection of resources sharing a security context. It makes maintenance easier.
Implementation Tips
Follow these guidelines to manage permissions securely and efficiently:
- Prioritize Built-in Roles: Start with standard built-in roles such as Owner, Contributor, Reader, and User Access Administrator. Avoid creating custom roles unless specific requirements exist. This reduces management overhead and aligns with standard ITIL Access Management practices.
- Use the Principle of Least Privilege: Grant only the specific permissions a user needs to complete their work. A security team might require a
Security Readerrole across resource groups for monitoring, rather thanContributoraccess. Review these permissions periodically to ensure they remain appropriate for the current staff roles. - Audit with Access Reviews: Use Azure AD Access Reviews to check that role assignments are still necessary. This helps you confirm that people who have moved to new departments no longer have access to their old resource groups. Automating these reviews helps eliminate permission creep where users accumulate access over time.
- Use Managed Identities: When Azure services need to communicate, use managed identities. This removes the need for service principals with stored credentials. Eliminating secret management reduces the risk of leaked keys and improves security.
- Automate RBAC Provisioning: Use Infrastructure as Code (IaC) tools like Terraform or Azure Bicep to define role assignments. Automation ensures consistency across environments and stops human errors during the manual configuration of permissions in the portal.
- Implement PIM for Elevated Access: Azure AD Privileged Identity Management (PIM) provides temporary access for sensitive tasks. This "just-in-time" approach is better than giving permanent high-privilege roles to administrators. It reduces the attack surface of your subscription.
4. Use Resource Tagging for Cost Allocation and Management
Effective cloud management requires a structured tagging strategy. Tags consist of key-value pairs—such as Owner:JohnDoe or CostCenter:Marketing—that you attach to resources and resource groups. These labels serve as metadata for logical organization. This practice supports accurate cost allocation, efficient operational oversight, and automated governance across your cloud environment.
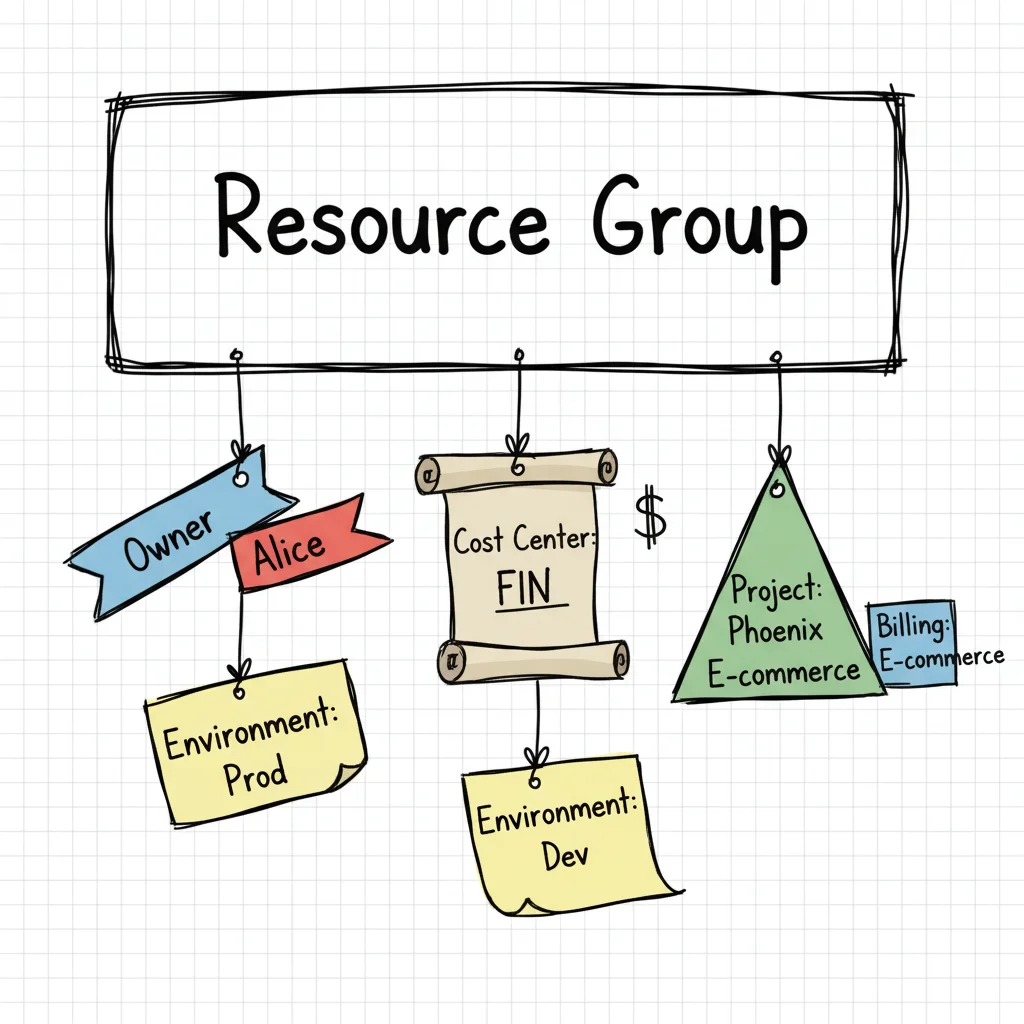 Conceptual illustration of an Azure Resource Group with essential tags for ownership, cost center, and environment, facilitating management and cost allocation.
Tagging a resource group creates a foundation for tracking assets, although tags do not automatically apply to every resource inside. Enforcing this inheritance usually requires specific policies. Once implemented, tags allow you to use Azure Cost Management + Billing to group and filter spending. This visibility lets you track expenses by department, specific project, or application owner. For instance, an e-commerce firm might apply a CostCenter:Marketing tag to assign cloud costs to a specific promotional campaign, a process that mirrors how AWS tags function for cost tracking.
Why This Method Works
Tagging offers a functional mechanism to manage assets that extends beyond the boundaries of subscriptions and resource groups. It converts metadata into a tool for automation and financial reporting. A DevOps team might apply an auto-shutdown:true tag to a development resource group. This tag can trigger an Azure Automation runbook to deallocate virtual machines every night, which lowers monthly bills. Security teams use similar methods, querying for resources with a compliance-required:pci tag to conduct configuration audits. This aligns with ITIL Service Strategy principles for financial management by ensuring every resource is accounted for.
Reflection Prompt: If your finance department requested a detailed cost breakdown by project or department today, could you provide it quickly with your current tagging strategy?
Exam Tip: The AZ-104 and AZ-900 exams frequently include questions about tags. You must understand that tags are used for filtering costs in Azure Cost Management, automating routine tasks, and enforcing governance via Azure Policy. Remember that tags applied to a resource group do not automatically flow down to its resources; you must use Azure Policy to enforce tag inheritance.
Implementation Tips
To use tagging effectively, follow these practical steps:
- Define a Tag Taxonomy: Establish a standard for tags across your organization before you build resources. Use mandatory tags like
Owner,CostCenter,ApplicationName, andEnvironment. Keep a central document of these standards for all teams. - Enforce with Azure Policy: Use Azure Policy to maintain your tagging rules. You can create policies that block the creation of resources missing specific tags or use the 'append' effect to add default values automatically.
- Automate Lifecycle Management: Apply tags like
ExpirationDateorCreatedByto run automated scripts. These scripts can notify resource owners about old assets or delete orphaned resources to prevent unnecessary spending. - Analyze Costs: Use the grouping and filtering tools in Azure Cost Management to review your spending regularly based on your tags. This identifies which departments or projects consume the most resources and highlights areas for potential savings.
- Query with Resource Graph: Use the Azure Resource Graph Explorer to run tag-based queries. This allows you to find specific resources across your entire Azure footprint for auditing or reporting. It is a powerful method for managing large environments. To learn more about this, see the guide on Azure Resource Tags for Management.
5. Establish Resource Group Limits and Quotas Planning
Proactive planning for quotas and limits is a fundamental part of azure resource group best practices. Many cloud engineering teams ignore these boundaries until a deployment fails during a high-traffic event. Every Azure subscription operates under specific default limits. These constraints cover everything from the number of storage accounts in a subscription to the total vCPU cores available in a specific region. If you do not account for these, you risk facing service disruptions when you need to scale up your infrastructure.
Understanding these constraints is vital for maintaining scalability. For example, an organization might see its application scaling efforts stop because it hit the default 980 vCPU limit in a specific region. This experience is similar to hitting instance limits within AWS EC2. Planning ahead ensures you can request quota increases before you hit a wall. You might also choose to design an architecture that spreads workloads across different regions or multiple subscriptions. This level of preparation aligns your cloud strategy with ITIL Capacity Management principles.
Why This Method Works
Predicting service limits prevents resource bottlenecks. By monitoring your quota usage, you can submit a request for an increase to Microsoft support well before it becomes a production emergency. This type of foresight defines a mature cloud operations model. It moves your team from a reactive state to a proactive one where capacity is never a surprise. It also leads to a more thoughtful approach to resource management and general cleanup. Even if a resource is not currently being used, it still consumes a portion of your available quota. Tracking these numbers forces teams to delete what they do not need to keep the environment lean.
Reflection Prompt: When was the last time you checked your subscription's vCPU quota in a critical region? Are you aware of other key limits your applications might hit?
Exam Tip: For the AZ-104 administrator and AZ-305 architect exams, you must understand that quotas are a fundamental constraint. Exam questions often describe a scenario where a deployment fails. The correct answer frequently involves a regional vCPU or storage account limit. Knowing how to check usage and request increases is a key skill to pass with confidence.
Implementation Tips
To manage quotas and prevent service interruptions, include these steps in your governance strategy:
- Document Key Quotas: Identify the specific quotas that matter most to your workloads. These often include vCPU cores, public IP addresses, ExpressRoute circuits, and network interface cards. Document these default limits in a central location so your team knows the boundaries at all times.
- Set Up Proactive Alerts: Use Azure Monitor to track your current utilization. Set alerts to notify the team when usage hits 75% or 80%. This provides enough time to request more capacity before the next deployment cycle.
- Request Increases in Advance: Support requests for quota increases can take several days or even weeks to process. Submit your request the moment you forecast a need for growth. Waiting until you are at 99% capacity is too late for most production needs.
- Utilize Azure Advisor: Review Azure Advisor recommendations regularly to find underused resources. Idle virtual machines or unused disks take up quota space that your production apps could use. Deallocating or deleting these resources frees up capacity immediately.
- Consider Multi-Subscription Strategies: Very large deployments may require more than one subscription. Spreading resources across subscriptions gives you a higher aggregate quota limit. It also provides better administrative separation and improves overall resilience.
- Automate Cleanup: Use automation or Azure Policy to clean up temporary resources in dev and test environments. Automating this process ensures that abandoned resources do not waste your limited quota and prevent new deployments.
6. Implement Azure Policy for Resource Group Governance
Applying Azure Policy is a necessary step to enforce organizational standards and keep control over your cloud environment. This governance service lets you create, assign, and manage policies that control or audit your resources. By applying policies at the resource group or subscription level, you can enforce rules for tagging, allowed resource locations, VM sizes, and security configurations automatically.
*A guide on using Azure Policy to enforce governance standards across your resources—a key skill for cloud administrators.*This proactive approach to governance is a fundamental part of a mature cloud strategy and ranks among the most effective azure resource group best practices. Instead of checking for compliance manually, these policies prevent non-compliant resource creation or flag existing ones for remediation. This saves time, lowers risk, and ensures you follow regulatory requirements like GDPR, HIPAA, or PCI-DSS. This process functions similarly to using AWS Config Rules or Service Control Policies in AWS Organizations for governance enforcement.
Why This Method Works
Azure Policy functions as an automated guardrail, making sure that all deployments adhere to your company standards, security levels, and cost-control requirements. For example, a policy can block the creation of any resource that is missing a CostCenter tag, which makes cost allocation accurate and mandatory. Another policy might restrict deployments to specific geographic regions to follow data sovereignty laws. This automation reduces human error and keeps the cloud environment consistent.
Reflection Prompt: What critical security or cost policies would you enforce first with Azure Policy in your organization to see immediate results?
Exam Tip: For Azure certifications like the AZ-104, you must understand how Azure Policy enforces compliance. Be prepared for questions on applying built-in policies, the differences between
AuditandDenyeffects, and using policy initiatives (sets of policies) to manage governance at scale.
Implementation Tips
To use Azure Policy for resource group governance, use these strategies:
- Start with 'Audit': Apply new policies with the
Auditeffect first. This logs non-compliant resources without stopping deployments, which lets you see the impact and find existing issues before you switch to the stricterDenyeffect. - Use Built-in Policies: Azure offers a large library of built-in policy definitions and initiatives. Use these templates before building complex custom policies, as they already cover most common governance needs.
- Establish a Hierarchy: Organize your policy structure through management groups. You might assign a strict initiative at the management group level to block insecure configurations, then apply specific tagging or location policies at the subscription or resource group level.
- Monitor Compliance: Check the Policy compliance dashboard in the Azure portal often to identify non-compliant resources and watch trends. Use remediation tasks to bring existing resources into compliance.
- Document Everything: For complex setups, you might need to Configure Azure Policy for Resource Groups. Write down the business reason for each policy so your team stays aligned and understands why the rules exist.
7. Monitor Resource Health and Implement Diagnostic Settings
Proactive monitoring is the foundation of a reliable and high-performing cloud environment. A major azure resource group best practice involves configuring diagnostic settings and Azure Monitor for every resource in the group. This approach moves your operations from a reactive stance to a proactive model. Instead of waiting for a support ticket, you can identify and resolve issues before they affect end users. Diagnostic settings make this possible by allowing you to stream logs and metrics to a centralized Log Analytics workspace for detailed analysis, visualization, and alerting.
This practice supports operational excellence. It is particularly vital for production environments where uptime and speed are the highest priorities. By capturing data on everything from database connection pools to API latency, you create a dataset used for troubleshooting, performance tuning, and security audits. For instance, an e-commerce platform can monitor for database connection exhaustion. Catching this early prevents a total outage during a high-traffic sale, protecting both customer satisfaction and company revenue. This logic aligns with ITIL Service Operations regarding event, incident, and problem management.
Why This Method Works
Centralizing logs and metrics provides a single view of your application health. You no longer have to check individual resources one by one. You can run queries, build dashboards, and set up alerts across your entire resource group. Consolidation makes it possible to correlate events between different services. You might find that a spike in CPU usage on a web server matches a slow-running query in a SQL database. This visibility significantly reduces the mean time to resolution (MTTR) for incidents. It allows your team to respond faster and minimize any potential downtime.
Reflection Prompt: How quickly can your team identify the root cause of an application issue impacting users? Would more granular diagnostic data speed up this investigation?
Key Insight: Do not wait for a service failure to set up monitoring. Configure diagnostic settings during the resource provisioning phase. This ensures you have a complete historical record of performance and security data. Such records are necessary for root cause analysis after an incident and are often required to meet strict compliance audit requirements.
Implementation Tips
To apply this practice effectively, use these actionable steps:
- Standardize Log Destinations: Create a dedicated Log Analytics workspace for each environment, such as
law-contosoApp-prod-eastus. This maintains a logical separation of data while still allowing your team to run cross-environment queries when needed for comparison. - Define a Monitoring Strategy: Identify the specific metrics that define the health of your application. Focus on error rates, API latency, and resource utilization. Align your dashboards and alerts with these indicators to ensure you meet your service level agreements (SLAs).
- Automate Alerting: Configure action groups to notify the correct technical teams via email, SMS, or webhooks when a threshold is met. Document runbooks for common alerts to guide a consistent response. This streamlines incident management during off-hours.
- Use Application Insights: Integrate Application Insights for application-level monitoring. It provides visibility into response times, failed requests, and dependency performance. This data pairs with Azure Monitor infrastructure metrics for a complete view of the system.
- Set Retention Policies: Configure data retention policies in your Log Analytics workspace to balance diagnostic needs with cost management. You might retain security logs for several months to meet regulatory mandates while keeping standard performance metrics for a shorter period.
- Visualize with Dashboards: Build Azure Dashboards that display key metrics and log query results. This provides the operations team with a quick health check and enables proactive management of the environment.
8. Design Resource Group Structure for Scalability and Multi-Tenancy
As an organization grows, its Azure footprint expands. A scalable resource group structure is a requirement for long-term success. One of the most effective Azure resource group best practices is to build a model that handles growth stemming from new projects, internal teams, or external customers. This strategic planning prevents the creation of chaotic environments that are difficult to manage later. These concepts align with enterprise architecture standards found in certifications like the AZ-305 and AWS Solutions Architect Professional. Common models include organizing resources by customer, by team, by project, or by specific compliance requirements.
Selecting the right model depends on your specific operations, billing requirements, and security needs. A SaaS provider often chooses a per-customer model to isolate tenant data and allow for granular billing management. Large corporations might prefer a per-team structure to align resources with internal cost centers and departments. A well-constructed structure serves as the foundation for effective governance. It is a major component of high-level certifications such as the AZ-305.
Why This Method Works
A scalable strategy provides a logical framework for security and billing as your environment increases in complexity. If you define a clear organizational model at the beginning, you can automate how resource groups are built. This allows you to apply governance controls like Azure Policy and Role-Based Access Control (RBAC) every time. When you onboard new clients or teams, they enter a predictable boundary. This setup simplifies how you allocate costs and manage access. It reduces the manual work needed to keep the system running. It also grants teams the freedom to work while the central IT department maintains control.
Reflection Prompt: Does your current Azure structure anticipate 5x growth in the number of teams, projects, or customers over the next three years without becoming unwieldy?
Exam Tip: For the AZ-305 exam, you must be able to Design Azure Resource Governance which includes selecting an appropriate resource group and subscription model for enterprise-scale scenarios. Be prepared to justify your choice based on requirements for scalability, security, and multi-tenancy.
Implementation Tips
To design a structure that supports long-term growth, consider these steps:
- Involve Stakeholders: Work with Finance, Security, and Operations teams to create a design that satisfies their specific needs for billing and management. This collaboration leads to a more complete solution and ensures the design is adopted across the company.
- Use a Decision Matrix: Compare models, such as per-project versus per-team, against your actual requirements. Weigh factors like security isolation and administrative overhead to make a choice based on data rather than a guess.
- Plan for Growth: Expect a major increase in the number of teams, projects, or customers over a 3-5 year period. Your chosen model must handle this volume without becoming messy. Consider how the structure would accommodate a company acquisition or a sudden expansion into a new market.
- Consider Hybrid Models: You are not limited to one single model. A common and effective pattern involves using a central resource group for shared infrastructure, such as identity services or core networking, while using application-specific groups for specific workloads.
- Automate Creation: Use infrastructure-as-code tools like Terraform or Bicep. Automation ensures that every resource group follows your naming conventions and has the correct policies and RBAC roles applied from day one.
- Document and Review: Write down your chosen model and the reasons you picked it in an Architectural Decision Record (ADR). Review this design once a year. This check ensures the structure still matches the way your business operates.
9. Establish Resource Group Deprovisioning and Cleanup Policies
Creating systematic processes for deprovisioning is a central part of Azure resource group best practices. Without a clear cleanup strategy, unused resource groups accumulate over time. This leads to unnecessary costs, creates security vulnerabilities within neglected resources, and produces operational clutter that makes management difficult. You should implement a formal policy to identify, validate, and remove unnecessary resource groups to maintain a clean, secure, and cost-effective Azure environment.
The practice involves building automated workflows and manual review cycles to manage the whole lifecycle of a resource group from its creation to its eventual deletion. For example, a DevOps team can configure a pipeline to automatically delete a resource group associated with a feature branch as soon as the corresponding pull request is merged. This stops orphaned resources from short-lived development tasks from staying active indefinitely. Otherwise, these resources continue to consume your budget and potentially expose sensitive data.
Why This Method Works
A deprovisioning policy directly stops cloud spending from spiraling out of control. When you tag resources with an "ExpirationDate" or "Owner," you can build automation that flags or removes them after a set period. This shifts cleanup from a reactive, manual chore to an automated, predictable process. It saves engineering time and reduces the risk of billing surprises from forgotten test environments. Digital decluttering is as essential for efficiency as keeping a physical workspace clean.
Reflection Prompt: When was the last time an old test environment or a temporary project resource group was mistakenly left running, incurring unnecessary costs or posing a security risk?
Pro Tip: Communicate cleanup policies clearly and provide plenty of notification before deletion. Send automated alerts to resource owners 30, 14, and 7 days before a scheduled deletion. This gives teams time to intervene if the resources are still needed. Consistent alerts build trust in the automation and prevent the accidental loss of important work.
Implementation Tips
To create an effective cleanup policy, use these actionable steps:
- Mandate Lifecycle Tags: Use Azure Policy to require tags like ExpirationDate, CreatedDate, or ProjectStatus on every new resource group. This data is required to trigger automated cleanup scripts and provide a clear audit trail for compliance.
- Automate Deletion Workflows: Use Azure Automation runbooks, Logic Apps, or Azure Functions to scan for resource groups with expired tags or inactive status. The workflow can delete them directly or move them to a designated "cleanup" subscription for a final grace period.
- Establish a Whitelist: Maintain a list of permanent or critical resource groups that are exempt from automated deletion. This list should include groups for shared services, production environments, or those with specific compliance-mandated retention requirements.
- Implement Approval Gates: Before the automation deletes a group, send a notification to a team communication channel, such as Microsoft Teams or Slack. Include an option to "snooze" or cancel the deletion. This keeps a human in the loop for critical decisions.
- Archive Before Deleting: For resource groups containing stateful services or valuable data, ensure your automation archives data, logs, or backups first. Move these files to low-cost storage like the Azure Blob Storage Archive tier before you execute the final deletion.
10. Document Resource Groups and Maintain a Central Repository
One of the most frequently ignored azure resource group best practices is maintaining thorough documentation. As an Azure cloud environment expands, undocumented resource groups turn into "black boxes." This lack of clarity makes troubleshooting, cost tracking, and security audits much harder than they need to be. Creating a central repository for every resource group ensures that knowledge remains accessible and operations continue even when staff members leave or change roles.
This practice involves recording details like the purpose of the resource group, the business owner, the technical contact, the cost center, and major architectural dependencies. This context allows anyone interacting with the resources to understand the logic behind them. It prevents accidental deletions during clean-up and simplifies daily management. Without clear records, a routine maintenance task can become a high-risk gamble. New hires also face a steeper learning curve, which slows down ITIL Knowledge Management goals and team productivity.
Why This Method Works
A well-documented environment acts as a single source of truth. It allows teams to work with confidence and speed because they are not guessing at the function of a specific component. It solves the "tribal knowledge" problem where vital information lives only in the heads of a few senior engineers. When a production incident occurs, having immediate access to documentation, runbooks, and contact lists can reduce resolution times and limit business downtime. Good documentation also speeds up onboarding for every new hire by providing a map of the architecture.
Reflection Prompt: If a key team member left tomorrow, how much critical context about your Azure environment, particularly about your resource groups, would leave with them?
Pro Tip: Documentation is a continuous process. Outdated records are as dangerous as no records. Integrate documentation updates into your standard deployment and change management workflows. Treat documentation like code: review it, update it, and keep it in version control.
Implementation Tips
To apply this practice effectively, use these steps:
- Create a Standard Template: Use a mandatory template for every new resource group. It should include fields for
Purpose,BusinessOwner,TechnicalOwner,CostCenter,CreationDate,Dependencies, andComplianceNotes. - Automate with Azure Resource Graph: Use Azure Resource Graph queries to pull and update an inventory of resource groups and their assets. This data provides a dynamic foundation for your documentation.
- Store Documentation with Code: Keep your documentation in a version-controlled repository like GitHub or Azure DevOps Wiki. Store it alongside your Infrastructure-as-Code (IaC) templates. This "docs-as-code" strategy ensures that infrastructure and documentation stay synchronized.
- Link from the Portal: Use the
Descriptionfield of the resource group in the Azure Portal to link to the detailed wiki page on SharePoint or Confluence. This makes information available right where the engineer is working in the console. - Schedule Regular Reviews: Set up a quarterly or semi-annual review to audit your documentation. Identify outdated entries and ensure every resource group is tracked. This governance activity prevents information decay over time.
10-Point Azure Resource Group Best Practices: A Quick Reference
| Practice | Implementation Complexity | Resource Requirements | Expected Outcomes | Ideal Use Cases | Key Advantages |
|---|---|---|---|---|---|
| Organize Resource Groups by Lifecycle and Environment | Medium — demands planning for resource movement and naming | Moderate — requires more resource groups, specific RBAC roles, and policies | Provides environment isolation and easier management with cost tracking | Production applications and CI/CD pipelines with separate stages | Lowers risk of accidental production changes; simplifies audits and cost allocation |
| Implement Consistent Naming Conventions | Low–Medium — depends on clear standards and strict enforcement | Minimal — requires basic documentation and Azure Policy or CI/CD checks | Improved resource discoverability and automation-friendly structures with fewer errors | Multi-region deployments and large inventories where searching is difficult | Simplifies resource filtering; clarifies ownership and purpose for the team |
| Apply Role-Based Access Control (RBAC) at Resource Group Level | Medium — requires specific role design and access audits | Moderate — uses identity management, Privileged Identity Management (PIM), and logs | Scalable permission management with consistent and detailed access trails | Multi-team organizations with separate developer and production permissions | Enforces least-privilege; makes onboarding and offboarding much simpler |
| Use Resource Tagging for Cost Allocation and Management | Low–Medium — needs a clear taxonomy and enforcement method | Minimal–Moderate — requires tagging policies and cost analysis tools | Accurate financial reporting and automated operations with spending visibility | Chargeback models and organizations running multiple internal projects | Enables precise chargeback processes; allows for granular cost analysis |
| Establish Resource Group Limits and Quotas Planning | Medium — involves analyzing usage and monitoring service limits | Moderate — requires active monitoring, alerts, and support requests | Prevents deployment failures and supports capacity planning and scaling | High-compute workloads and applications that span several Azure regions | Allows for proactive scaling; reduces downtime and supports SLAs |
| Implement Azure Policy for Resource Group Governance | High — demands design, testing, and maintenance to avoid blocks | Moderate–High — requires policy management skills and compliance dashboards | Automated compliance and prevention of non-compliant deployments with trails | Regulated industries and large organizations that standardize at scale | Replaces manual checks with automated enforcement; ensures consistent governance |
| Monitor Resource Health and Implement Diagnostic Settings | Medium — involves configuring log collection and alerting rules | Moderate — uses Log Analytics, storage retention, and monitoring expertise | Detects issues before users are impacted using centralized logs | Production workloads and security-critical apps where uptime is prioritized | Improves system reliability; shortens repair time via diagnostic data |
| Design Resource Group Structure for Scalability and Multi-Tenancy | High — requires strategic alignment between technical and business teams | High — uses management groups, governance frameworks, and automation | Scalable organization with clear boundaries and transparent billing | SaaS providers and large enterprises with complex internal structures | Supports long-term growth; balances autonomy with central governance |
| Establish Resource Group Deprovisioning and Cleanup Policies | Medium — needs automated scripts and formal approval workflows | Moderate — uses automation tools, expiration tags, and backup processes | Lowers monthly costs and reduces technical debt or clutter | Environments with short-lived resources like sandboxes and test labs | Saves money; automatically removes orphaned resources that lack purpose |
| Document Resource Groups and Maintain Central Repository | Low–Medium — requires discipline to keep shared templates updated | Minimal — uses a documentation platform and inventory export tools | Single source of truth for faster onboarding and audits | Large teams with staff changes or in regulated sectors | Preserves institutional knowledge; makes incident response more effective |
From Plan to Practice: Implementing Your Resource Group Strategy
We have reviewed the primary strategies for Azure Resource Group management, from lifecycle tracking and environment-based organization to the requirements for naming, tagging, and cleanup. Each method—whether it involves scoped RBAC or Azure Policy—acts as a control point for your cloud resources. Viewing these practices as a unified strategy helps you build an efficient, secure, and predictable Azure environment.
Managing these azure resource group best practices involves more than keeping a subscription organized. It creates a stable operational framework for speed and reliability. When you organize resource groups logically and apply consistent governance, teams can deploy, manage, and monitor applications with autonomy. This structure prevents cost overruns, reduces security risks, and cuts down the time engineers spend on administrative tasks.
Your Actionable Next Steps
Turning this information into results requires a clear plan. Avoid trying to fix everything at once. Focus on incremental improvements that show immediate results.
- Audit and Assess: Review your current resource groups. Use the ten practices discussed in this article to grade your existing setup. Look for major gaps like orphaned resources that are still running despite serving no purpose. Inconsistent tags or overly broad RBAC permissions are often the easiest problems to fix. You can use Azure Resource Graph queries to find resources that lack required tags or proper naming formats.
- Prioritize and Plan: Choose two or three areas that provide the most value. For most organizations, this means standardizing naming conventions or adding tags for cost tracking, such as
CostCenterandOwner. Set up a short-term project to apply these tags across your environment. This creates immediate visibility for finance teams and department heads who need to track monthly spending. - Automate Your Governance: Governance should not be a manual process. Once you define your standards, use Azure Policy to enforce them automatically. This ensures that every new resource follows your rules from creation. Automation is also necessary for deployment. Connect your infrastructure-as-code templates to your CI/CD pipelines. Reviewing the best CI/CD tools can help you find an automation engine that enforces your resource group strategy during every code commit.
Key Takeaway: The value of Azure Resource Groups comes from the discipline you apply to them. A solid resource group strategy shows a high level of cloud operational maturity. It marks a move from reacting to problems to managing resources strategically—a mindset necessary for any IT professional.
If you are preparing for exams like AZ-104 or AZ-305, you must understand these concepts thoroughly. The current exams test your ability to apply these practices to scenarios involving cost management, security, and governance. For example, you might be asked how to prevent accidental deletion while allowing updates. Learning why these methods work will help you in the exam and in your career.
Adopting these azure resource group best practices is an investment in your infrastructure’s scalability. It creates a predictable foundation that protects your assets and ensures financial accountability. Setting up a strong strategy now will prevent technical debt and allow for growth without the chaos of unmanaged resources.
Ready to gain new skills and move forward with your Azure certification? MindMesh Academy provides labs and learning paths that use real-world scenarios to teach the azure resource group best practices we covered. Stop reading about governance and start applying it with expert help. Look at our resources at MindMesh Academy.
Ready to Get Certified?
Prepare for your exams with professional study guides, practice exams, and flashcards using spaced repetition at MindMesh Academy today:

Written by
Alvin Varughese
Founder, MindMesh Academy
Alvin Varughese is the founder of MindMesh Academy and an enterprise architecture leader. An electrical engineer by training, he moved from factory automation in South Africa to cloud architecture at GE Appliances and Humana (Fortune 50), and holds 20 professional certifications including AWS Solutions Architect Professional, Azure DevOps Engineer Expert, and Microsoft Agentic AI Business Solutions Architect. He built MindMesh Academy after interviewing too many highly certified candidates who couldn't answer basic questions: the goal is prep that makes you better at the job, not just able to pass the exam.